
Hello, Mr. Weedcroft here.
I have completed a full growth cycle by growing an autoflower cannabis plant. From seed to harvest – drying – and curing. I want to tell you about my findings in this experiment. The controls are as follows
- Auto flower “ZkittleZ”- Genetics: Dr. seeds
- 3 Gal fabric pot
- Coco Coir
- 4-foot long fluorescent work light 18/6
- Remo nutrients
- 1-foot width by 4-foot length by 4-foot high enclosed tent
- drying rack
In the following article, I break it all down and explain what I did and how I did it and what the results were.
From seed
I used a seed from Dr. Seeds genetics called Zkittlez.
TYPE
AUTOFLOWER
LINEAGE
RUDERALIS + ZKITTLEZ
LINEAGE
RUDERALIS + ZKITTLEZ
YIELD
INDOOR: 400-500 GRAMS / SQUARE METRE, OUTDOOR: 800 GRAMS / SQUARE METRE
HEIGHT INDOOR
40 INCHES
FLOWERING TIME
8-9 WEEKS
DIFFICULTY
VERY EASY
SUBTYPE
HYBRID + RUDERALIS
TERPENES
SWEET, GRAPE, BERRY
That information is on is from their website. I would imagine the YEILD is under the best conditions, however, this case study is for a plant that was grown in poor conditions.
I started this plant from seeds. The germination process started from the seed using it by putting it in a glass of mineral water (Costco bottled water) for 12 hours until the seed sank to the bottom of the glass. Then wet a paper towel with the seed in the fold. The seed popped in about 48 hours and the taproot grew half an inch in the following 24 hours.
I put the seedling into a biodegradable cube (similar to rock wool) Taproot down and lightly closed up the top hole. It took about 2 days to emerge and 6 days for the roots to show on the cube itself.
I trans-planted it into a red solo cup filled with Coco coir and started to feed with (1/8th on the recommended week 1 food chart) nutrients. I grew it like this for about a week and the transplanted it into the 3 Gallon fabric pot for the final duration of the plants’ life.
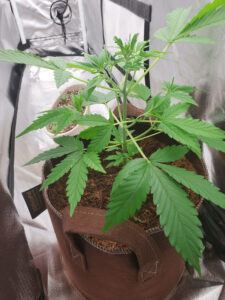
Vegetation Stage

At this point, the plant is about 3 weeks old. It was growing strong. I fed the plant with Remo Nutrients. Grow, Micro, Velokelp, MagNifiCal. Following the feed chart starting in week 1. Through to week 4. Each time giving the plant 1/2 Gal of PH balanced (somewhere between 5.5 and 6.5 PH) Lukewarm tap water. Tap water here is about 7 to 8 so I needed to PH down the water. I fed it with nutrients and pH water every feeding and fed it once every 3 – 4 days. Since the room had adequate airflow the coco coir always looked and felt moist. (this usually a problem for regular growth as the media never has a chance to dry out, therefore, raising the potential of root rot)
For the light, I used a 4-foot fluorescent work light that you can get at any tool store like home depot. The light was set on a timer for 18 hours on and 6 hours off. I kept the light no more than 6 inches away for the top of the plant.
I very little air circulation in the room. No fans and the ports of the tent were close except where the cord for the light went through. So the only new air exchange was when I opened the tent daily to check up on it.
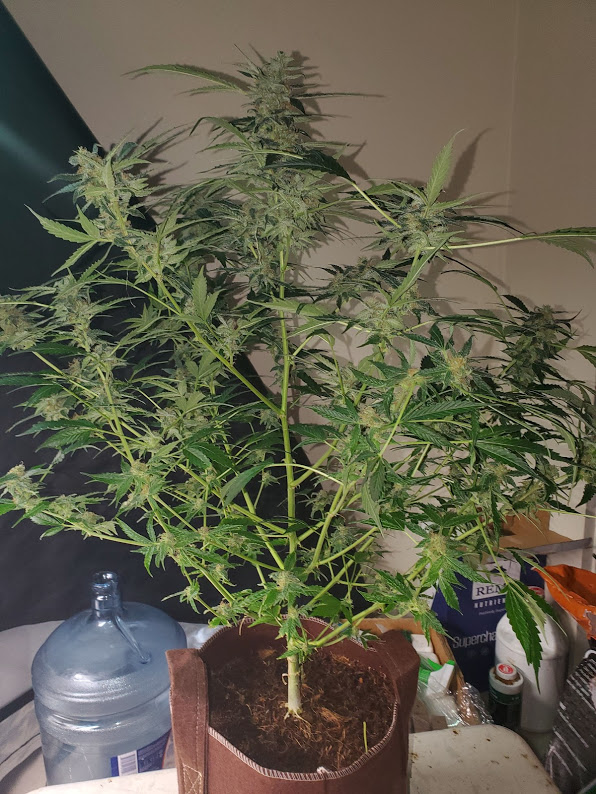
I didn’t train the plant and just grow her up naturally. The structure is like a Christmas tree (or for the non-Christian a “conifer tree”)
It was 6 weeks from seed that I started to notice pre-flowers show up.
Flowering
At the end of week 4 on the feeding chart (week 8 from seed), she was ready to start flowering. I continued with the regular watering/feedings starting from week 1 to week 8 on the Remo FLOWERING feeding chart. I gave the plant 1/2 gallon (2 liters) of PH balanced water and the required nutrients.
As for the lights I kept them on for an 18 hour on 6 hours off cycle. I wanted to see if it was true, that the auto flower will grow buds regardless of how much light is on. * it’s true*
The Auto zkittlez was a sturdy plant with a thick stock and thick branches. I was surprised, do to no wind to help produce the strong branches.
In the final weeks, the flowers were looking quite nice, they were smaller than when grown properly but the trichomes production was about the same. I let the plant grow a little longer than what the genetics call for. At the beginning of week 8 (week 15 from seed) I started to flush the plant.
For the first flush, I ran 8 gallons of PH balanced water through the Coco coir to wash out any salts and nutrients. I let that sit for 3 days and then flushed again, but this time I used 6 gallons of PH balanced water and 1 gallon of PH balanced water combined with Final flush from advanced nutrients. (to help the plant use up any remaining nutrients withing the stem, leaves, and flowers) it helps with the taste and burns cleaner in the final product.
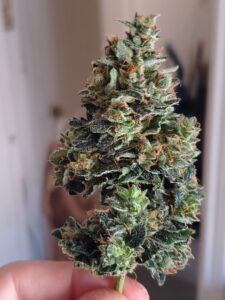
By the end of flushing, the trichomes’ colors were mostly milky white with maybe 5% amber. I used a 30x microscope to see the trichomes up close. I knew it was ready to be harvested
Harvest
Once week 8 was over, the flush was completed and the trichomes were ripe, it was ready to harvest all my hard work or lack thereof.
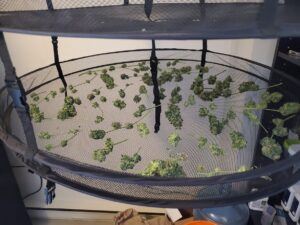
I started from the bottom of the plant cutting off each lower branch while trimming the buds for drying. The trimmings were put into a paper bag for drying and processing later on.
I think it took me about 2 hours to harvest the whole plant. I had weighed out the buds while they were fresh (wet) and the total weight was 112.8 grams. That might sound like a lot but during the drying process the buds will lose about 75% of the weight
Drying
When it came to drying I used a dry rack that is hung from my ceiling. I laid out all the trimmed buds on the rack and dried them for 9 days before weighing and putting the buds into a canning jar.
The total weight after drying was 23.2 grams. Just over 3/4 of an ounce. Before I dried the buds they looked like a good size bud with all things considered but after it was dry those buds were popcorn buds. (tiny buds)
Curing
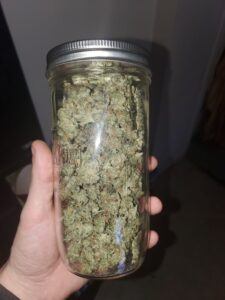
After the buds were dried I put them in a canning jar. (mason jar) this is where they stay for the next 3-4 weeks opening the lid of the jar at least once a day. (burping as some would say)
the reasoning behind curing the buds in glass jars is to help the bud dry out completely and by doing so it will develop the terpenes more (aroma/smell) produce a sweeter taste and makes the smoke smooth without any harshness.
Smoking
once the bud was cured the trichomes seemed to have glitter on them. The smell from within the jar smelled sweet like berries. I had rolled a joint with .5 (half a gram) it was easy to roll the cannabis was not dusty dry nor was it moist.
the joint burned even and clean (the ash was light gray in color) and had a smooth hit every time. It tasted like sweet, the high was good and even. Mostly head high with a little bit of body. it was more of an energetic high one that I can write an article after smoking one. ( this article is the one that I am writing after smoking the joint)
Conclusion
All in all, I thought that this was a successful grow even knowing that I treating this plant poorly and in crappy conditions. It does go to show that these auto flower plants’ will grow in poor conditions and still produce a decent final product. If grown properly under optimal conditions it is a great plant with nice genetics. I will be growing this one again but treating it better.
I hope that had enjoyed this case study. I will be telling more about my future grows. If you have any questions or comments about this case study or anything else related to cannabis, Please leave a message below!
Take care,
Happy Growing!!!
were the tubes in your fluorescent light unit cool white , or warm white, 75 watt? ,,, a T5 HO unit with six tubes would probably have doubled your yield, however as you were purposely growing under less than optimum conditions it is good to see that you made it work..
Hi Mike, the tubes on the light are cool white. I know if I were to use a t5 bulb, I could have gotten better results, but I wanted to see how it would grow under a cheap light. I have a T5 lamp that I use for clones and seedlings. I use the cool white bulbs in my veg tent.